
Today I wanted to talk about a project I’ve been working on, and detail some of the things I found and stuff I tried. I think it’ll be a good post mortem for myself to study later when I need some of these tactics again.
A couple years ago, after watching a wonderful presentation at BlackHat, I bought a cheap $20 unbranded netcam. The camera came with a serial number on the bottom (C7824WIP). The camera itself isn’t the worst, I mean it is a low quality Chinese camera, but the features on the device were pretty interesting. It has 2 axis panning, infrared night vision, speaker, microphone, and both wireless and wired connections, which is pretty good considering it only cost me like $20. However, a couple aspects about the device really made me worry, and as a security guy, I wanted to dig deeper.
I decided I’d try to do a full security audit on the device. I wanted to try it because I didn’t really know anything about security cameras at the time, and I really wanted to try some of the skills I’ve picked up over the years. Black box testing can be really fun, and I love trying something I have little knowledge of just to see if I can succeed.
Camera Hardware
The camera itself has some pretty useful hardware, some which could be very easily taken advantage of with the right tools.
Just a couple simple Phillips screws and you are inside.
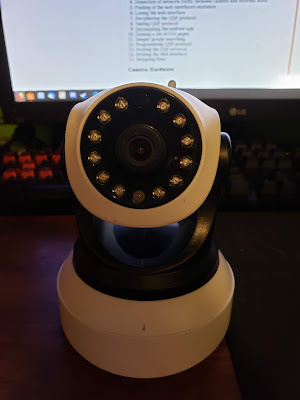


The processor it uses is a HI3518 which apparently has already been hacked by other means. I quickly read through this article and unfortunately failed to locate any TX/RX pins I could solder into. I was a little disappointed by this, I had a spare USB PL2303 lying around for just such an occasion.
When googling the HI3518 I noticed a website ispyconnect.com which seemed to be some sort of IP Camera database. I used their website to search for my model of camera and ended up finding out the company who manufactured it, VStarCam. I want to point out, there is not a single marking anywhere on the device, including on the inside that would signify this to anyone. I also learned on this page that the camera can be potentially controlled by simple GET requests.
On one side of the board you can see an addon board where they added the wireless radio. (It’s the blue PCB with the big silver square and the grey wire)
One other thing of note, the whole camera is powered by 5V DC, meaning you can power this thing off any USB port that can supply at least 1A. This is actually a pretty cool feature, because there are cheap USB battery backup options that could be used to augment the camera so it records even when the power is turned off.
Basic Enumeration
Before I work on sniffing the client communications, I wanted to try a little discovery first to see anything interesting with the device.
NMAP
Since the device was pretty much a black box to me, I wanted to see if I could discover any services/open ports beforehand. Nmap didn’t notice any open ports when I scanned, which was a bit odd.
Setting up network sniffing
You can set this up one of two ways depending on the hardware
Poor man’s method
For this you need either:
- Two USB to Ethernet Dongles
- Two PCI Wired Ethernet Cards
Use a utility called brctl, it’s fairly straight forward to set this up, but I did have issues here and there with weird drops in connection.
These are the commands I used
- brctl addbr br0
- brctl addif br0 [camera-interface]
- brctl addif br0 [sniffing-interface]
Rich man’s method
For this you need
- One USB to Ethernet Dongle or PCI Wired Ethernet Card
- Enterprise level switch
When I found out I could do this with my Cisco Catalyst 3750 I was ecstatic. For some reason, bridging didn’t always work 100% as expected with the USB dongles and sometimes my internet would drop out while I was listening in on the camera. Once I found out you can use monitor session to forward packets from the camera to a one directional port, it saved me a lot of time and heart ache.
Just add this to your config.
monitor session 1 source interface Gi4/0/13
monitor session 1 destination interface Gi4/0/23
Auditing Android Client
I figured since a majority of people would be using the Android client, I would start my audit there. The Android app, Eye4, is available in two separate downloads, one from the Eye4 site, and one from the Play store. They also have a Windows download, which I will audit later.
The first thing I wanted to do is compare the Play store APK with the Eye4 site APK to see if there is any foul play going on, but unfortunately their personal download on the site didn’t work and lead to a blank page.
We want to start our network sniffer, and begin our testing process.
First thing we want to do is boot the camera up after resetting it for the first time. This makes sure we have a clean slate when working with the camera. We will be resetting the camera multiple times to make sure we have lots of samples to compare.
Without connecting to any client, we will boot the camera up, connect to our sniffer, capture all the boot network data, then reset the camera, stop capture, and restart the whole thing. We do this about 2-3 times to get an idea of what the booting process looks like.
After that, we will connect the camera to the client, by searching for LAN in the client and connecting that way. Delete the camera, reset, then try it again. Do this multiple times to get multiple captures.
After that, we will fully connect the camera to the app, changing the password, as well as using various features, such as camera control, taking videos/pictures, changing settings, etc.
Once we are satisfied with our captures, we will begin dissecting them packet by packet.
Boot Sequence
First impressions of boot sequence captures, what do we notice?
- Take a look at some of the packets in the capture.
- Do we see packets that have similar contents?
- Can we see similar parts of packets that have small contents changed or replaced.
- Do we see plaintext words/phrases?
- Do we see commonly known numbers, ids, serial numbers, etc?
If you answered yes to any of these then the device most likely doesn’t use encryption. This also means the device leaks data.
So let’s go through the packets.

The first weird thing I noticed is that the camera picked up a weird IP address for my network. It started out with the ip address 192.168.1.126, but my internal network range is 192.168.11.(100-254) meaning this camera had already come with this configuration. It also broadcasts an ARP looking for 192.168.1.1, and sends out a bunch of “Hello I’m online!” messages. Already this doesn’t bode well, as it looks like they aren’t using any encryption. Maybe it’s a fluke, let’s dive deeper.
I also saw that the device also contacts a couple external hosts
- s2.vstarcam.com via UDP
- s3.vstarcam.com via UDP
- s2.eye4.cn via UDP
- An Amazon EC2 instance via UDP
- Google’s public DNS, looking for baidu, wshifen.com, a.shifen.com
- An Alibaba cloud instance which it talks to via HTTPS.
- A Tencent cloud instance which it talks to via HTTP
- time.windows.com via NTP
What did we learn?
- The device may not use encryption
- The device may leak data as a result.
Let’s take a look at the client’s first registering of the camera, and it’s first communications.
Registering the camera
I loaded the app onto an android emulator and went to town. I started by registering the camera to the client by using the “search for LAN” feature.

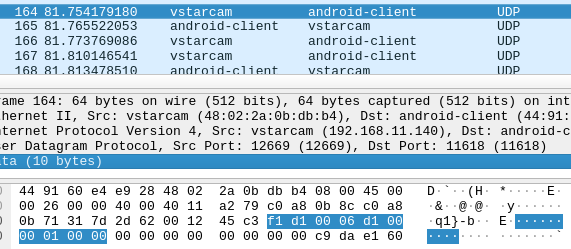
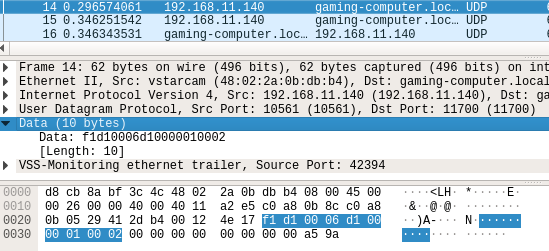
First thing we notice is that when the Android client initiates the connection, it doesn’t talk directly to the camera, it instead sends a UDP packet with the contents 0x44480101. We will call this the Discovery Broadcast Packet or DBP for short. he camera then replies back with a 0x44480108, and then dumps a bunch of settings information to the broadcast address. We will call this the Discovery Broadcast Reply or DBR.
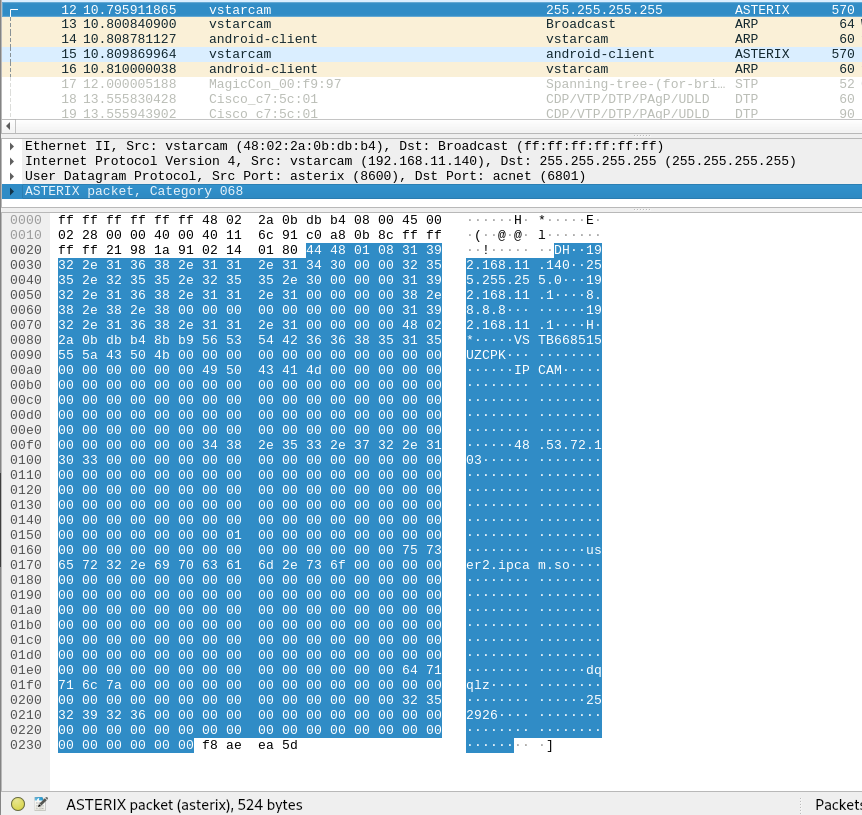
For some reason Wireshark labels this packet as an ASTERIX packet, which when I looked it up seems to have nothing to do with this protocol. Maybe it shares a port or something and Wireshark incorrectly labels it.
When you look at the data incoming, we can start to see how this packet is laid out. The first 4 bytes are a signal to the client that it’s looking for it, the followed by a space specifically carved out for an IP address, plus one 0x00 byte to delimit. The way we can tell this is because if we were to count the chars in a full IP address string (XXX.XXX.XXX.XXX which is 15 bytes, plus a 0x00 byte to delimit, making it 16 bytes.) We can see the next IP address (Which is the netmask) would be adjacent to that.
The camera then sends an exact copy of the packet it just broadcast, directly to the client.
After this little dance the camera and client talk directly to each other. We see it chooses the port 47499, which when converted into hex is 0xB98B. We can see in the 0x80 row of the large packet above, there is a 0xB98B in little endian. This must be how the camera negotiates what port the client will talk to after the discovery phase.
When we compare this port number to our other captures, (remember, I captured the registration process, then reset the device, then did it again to see if I could notice any patterns.) we notice that the port changes with every reboot.
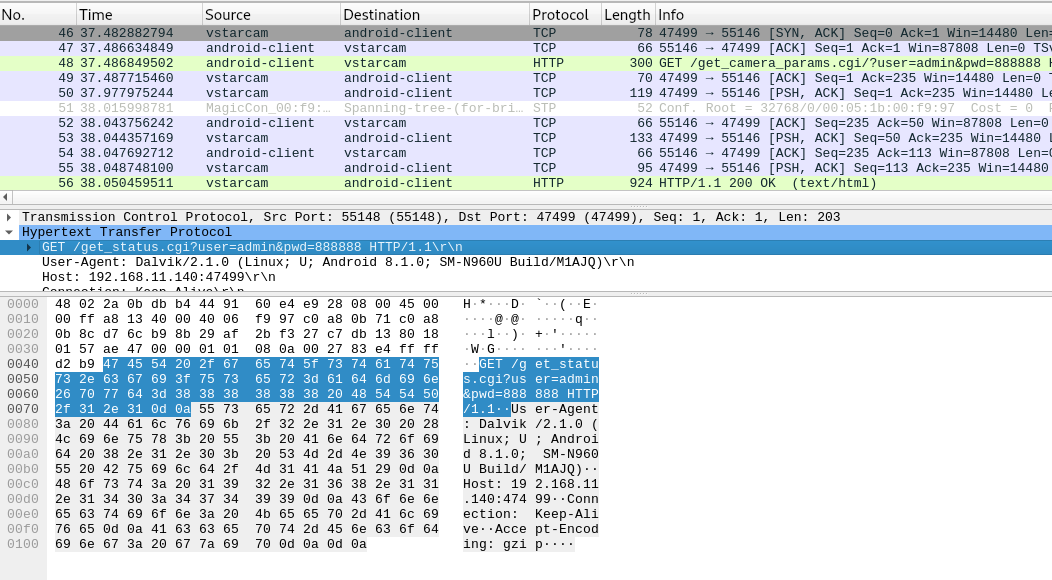
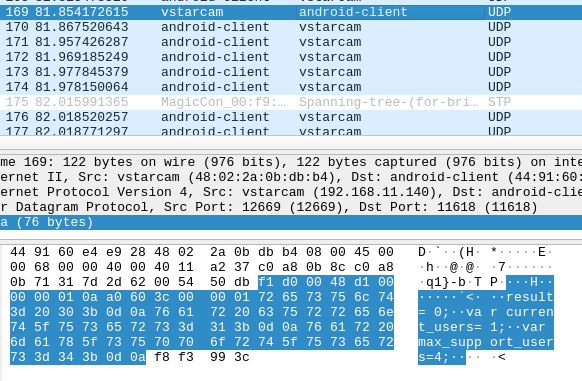
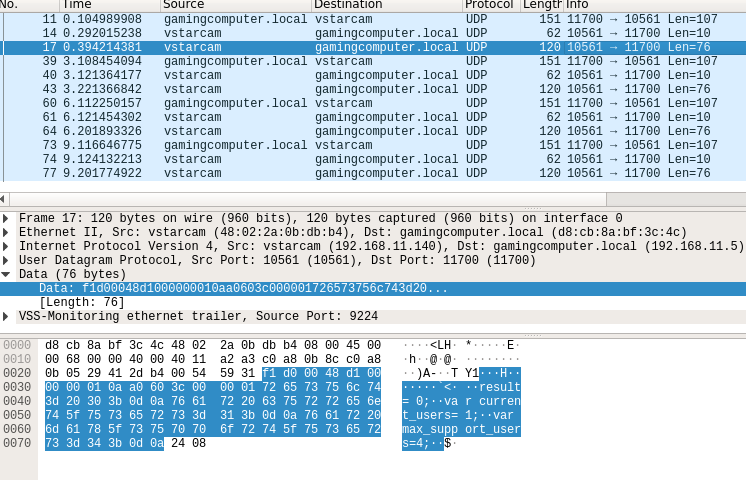
Looking at the contents of the HTTP GET request shows a sad truth, the devices doesn’t use any encryption for it’s client communications. This super concerning because not only does this compromise security of the device, especially on wireless, in an earlier capture, we have SEEN the device actually use SSL. So they are just choosing not to?
Looking at the reply brings much of the same sadness.

Looking at the HTTP headers, we can also see that the web server the device is GoAhead webs, an embedded web server, and it also hasn’t been updated since 2004. JUICY!
So this is where it gets interesting.
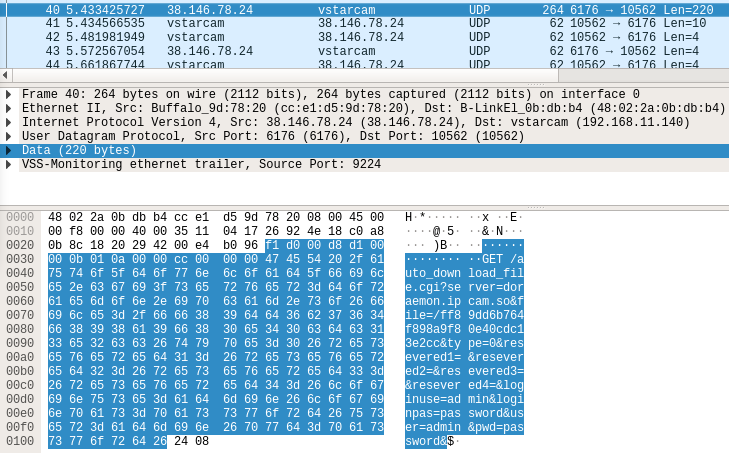
So, they already have an HTTP server to talk to the camera and serve CGI scripts, but they decided to add an extra protocol on top of that. This is where some strange UDP protocol starts to come into play.
Even though the camera and client were literally just talking via HTTP, it seems to forget all about that and try again to search for a new camera. The client sends out a 0xf1300000 packet to my subnet’s broadcast address (192.168.11.255). We will call this packet the Broadcast Connection Packet or BCP for short.

The camera then replies back with a small part of its UID and the letter A. The client repeats this message back to the camera. We will call this the Broadcast Packet SYN or BPS for short.

The camera then sends the same packet back, this time with the A changed to a B. We will call this the Broadcast Packet ACK or BPA for short.

Finally we arrive at the main phase of the connection, here we can observe three things happening.
-
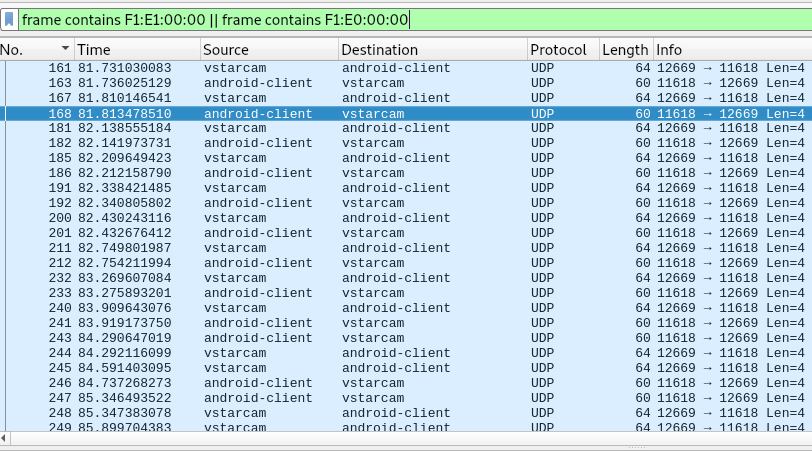
- The client and the camera are constantly engaging in a “ping pong” pattern message loop, where if either the client or the camera receives a 0xF1E0000 or 0xF1E10000, it replies back with the other packet. So for example, if a 0xF1E0000 is received it will reply back with 0xF1E10000. For reference 0xF1E0000 is ping, and 0xF1E1000 is pong.
- You can illustrate this best by using the Wireshark filter below
- frame contains F1:E1:00:00 || frame contains F1:E0:00:00
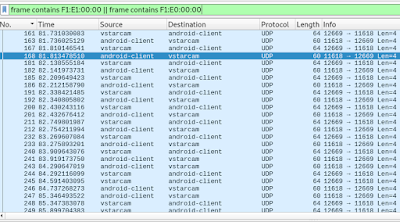
- frame contains F1:E1:00:00 || frame contains F1:E0:00:00
- You can illustrate this best by using the Wireshark filter below
- The client sends GET requests with a special header, via UDP to the camera. The client receives replies back denoting success or failure, and the results of the query, sometimes broken up into multiple packets.
- The client receives video and picture data from the camera.
- livestream.cgi
- snapshot.cgi
- audiosteam.cgi
- The client and the camera are constantly engaging in a “ping pong” pattern message loop, where if either the client or the camera receives a 0xF1E0000 or 0xF1E10000, it replies back with the other packet. So for example, if a 0xF1E0000 is received it will reply back with 0xF1E10000. For reference 0xF1E0000 is ping, and 0xF1E1000 is pong.
Let’s focus a little more on number two, since one is already solved, and three requires more extensive knowledge of video formats and decoding.
UDP GET Requests
Let’s tear down the request.

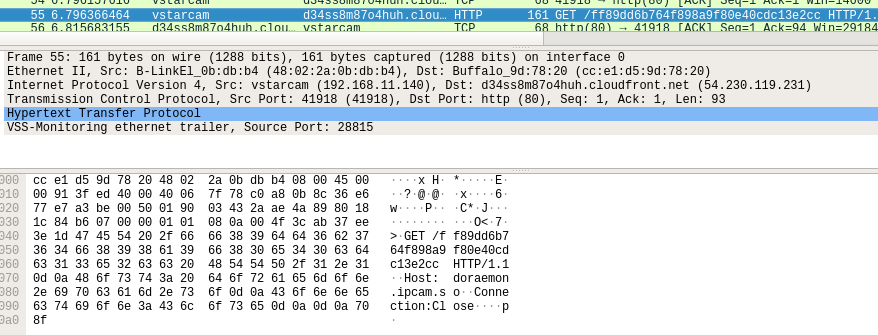
The first 16 bytes of the packet are some sort of specialized header. We are going to want to get more samples of these to be able to learn how to forge our own. We also want to get samples to see if it might be vulnerable to replay tactics as, the header might block potential replay attacks. After that comes the GET request. Right off the bat we are hit with another oddity of the client, credential leakage, and unnecessary duplication. Not only are the communications not encrypted, so it also leaks the password on every GET interaction but, it also repeats the credentials twice just in case the first time wasn’t good enough.
A short time afterwards the camera sends a packet that looks like this. This seems to acknowledge that the command went through.

Here we see another GET Request but this one is called “trans_cmd_string”. No idea what this did at the time, but I took note of the two arguments cmd, and command.
We see a standard reply, again, comes with a special 16 byte header, and what seems to be some sort of Javascript or some sort of configuration. This was the reply to check_users.cgi.

This is another oddity, some times the GET request would have multiple stacked inside, starting with a 16 byte header, and padding each request with 8 bytes in the front.
What did we learn?
- The device has some sort of HTTP service open, but the port changes for some reason, most likely with reboot.
- The device has some strange UDP protocol that encapsulates GET requests sent to the netcam.
- The device leaks username and password, as well as has confusing and strange argument duplication
- The device uses no encryption what-so-ever to encrypt video feeds and pictures sent by the device to the client.
- UDP GET requests have a special packet header
- The protocol is written in faulty ways, exemplified by the duplication of elements, strange request packing, and odd behavior.
Writing a Client
Now that we have learned some interesting things about the communications, let’s see if we can write our own suite of tools to work with the camera.
Before we start, I’ll be using the wonderful programming language from the boys over at Crystal. It’s a very fast, statically typed language, with very zen and down to Earth syntax. The meta-programming aspect of the language is very cool!
First thing we should do is talk about design.
From what we can see right now the camera and client go through different states, things like sending the DBP, waiting for the BPA, that sort of thing. As such, we will want to make a simple state machine. Here is the basic outline of the functionality we need.
The idea is that whenever we change the state of our client, we are moving to the next phase of communication.
Next big thing we need to talk about are Fibers. If you are unfamiliar with them, I would suggest reading this article.
We have two main tasks, we need to have a Data Loop, which will take data in from ports (depending on the state of the client, choose which port to use), and then take that data and shovel it off into a channel. Then we will have the Tick Loop, which will run the decisions to be made on the incoming data.
Starting the Client
One of the first things we want to be able to do is start the client, and have it “idle” while waiting for connections.
The main idea is that we set up the client, making a variable that will track if it’s running or not. It also sets up the ports we need to communicate our discovery broadcast, as well as the UDP data socket. We also have a method run which will stop the method if it is already running, change the state to the first phase, then start our fibers for data and tick.
Fiber Design
First we need to initialize our two fibers and our one channel.
Then we want to write our two “start fiber” methods. We reassign the fiber variable for the action, trap any exceptions and rescue them out (specifically for the case of the ports shutting down while sending data), create a while loop with is_running? as a condition, and then fill in the meat of the fibers.
Data fiber will block on the data socket, then transfer any data received to the channel.
Tick fiber will run the update tick continually until the client is no longer running.
Closing the Client
When the data fiber is blocked, there is no way to “kill” the fiber when we want the program to exit. Instead, we need to simulate some data into the socket, freeing the fiber to execute and close itself.
First we turn @is_running to false, then send the “unblock fiber data” into the data socket. We then use a Fiber.yield to give control back to the data fiber.
While we can’t give control back directly to the data fiber, we know that the tick fiber will most likely be blocked and the data fiber will get it’s turn.
We then close the sockets, change_state to closing, and set the target camera back to 0.
Tick Layout
In the tick method, we want to layout a basic pattern of transitions for the client.
DBP and DBR
We need to send our DBP, so we can start to discover cameras. This process is fairly straight forward.
# Destination address for the discovery packet
After sending we want to wait until the camera responds with the DBR. We also want to parse some of the data coming in, as it has some juicy info we might want to reference later.
BCP and BPR
We then want to send a BCP to broadcast now that the DPR has been resolved.
# F130 broadcast packet data
We now need to handle the handshake, which consists of broadcasting a BCP and waiting for a BPS, then replying back with a BPS, and then receiving a BPA.
Main Phase
Now we need to handle the ping pong packets! This is super simple now that we have finished the hard part.
Testing the work so far
If we open up Wireshark and listen in to the connection, we should see that pings and pongs should coming through, and there should be no errors. Also the LOG should show that there were no errors as well.
Here’s the code I used to run it.
In the screenshot, we can see no errors or unexpected output. We get some destination unreachable errors at the end because that’s when the server shutdown.
From the LOG we can see everything is good!

Doing a little packet capture analysis, we can also see we have received a new packet, 0xf1f00000. This packet seems to be sent after a certain number of pings and pongs were missed. We can assume this is some sort of disconnection packet, and we should reflect that in our code
# Packet sent when the camera has timed out from ping-pong
def send_disconnect
After we send the disconnect packet, the camera will send one of it’s own. To avoid a destination unreachable, we should sleep for 0.1 seconds just to let the packet be received by the data socket, even though we aren’t going to do anything with the packet
Replaying Requests
We are really hauling through this, now it’s time to see if we can replay a GET request via UDP. For this, we will want to go through our captures and grab a couple GET request data packets, including the 16 byte header in the front of the data.
Decompiling SO
The best way to do this in Wireshark is to find the packets using the filter
- frame contains GET
Then go to the details pane (it’s the one above the hex dump and below the packet stream), right click on the Data heading, click Copy, then click As Escaped String. For this I will choose the first UDP GET request in the search.

Once we have the string copied, we can write our simple code to replay the packet.
After our GET request was sent, we should have gotten two new packets to inspect, some sort of acknowledgment and the results of the command.


We can see the replay was successful! Now we know packets can be replayed, but to what extent? Can we replay ANY request packet? Let’s take a packet a little further down the line.
This time when we send the replay let’s see what happens.
This time we get something a little different. We got the “acknowledgement” packet but we didn’t get any results. Upon closer inspect we can see the two acknowledgement packets are just slightly different, the last byte on our success being 0x00 and the last byte on our failure was 0x02. We now know that the order of the packets is important. This could signify that the mysterious header has some values in it that track order of packets.
Let’s learn more.
The next thing we are going to want to try is to modify a request, and see if we can get it to teach us something new about the protocol.
CHECK_USERS_HEADER=”\xf1\xd0\x00\x68\xd1\x00\x00\x00\x01\x0a\x00\x00\x5c\x00\x00\x00″
CHECK_USERS_REQUEST=”GET /check_user.cgi?name=123456789&loginuse=admin&loginpas=password&user=admin&pwd=password&”
CHECK_USERS_MODIFIED_REQUEST1=”GET /check_user.cgi?name=44444&loginuse=admin&loginpas=password&user=admin&pwd=password&”
CHECK_USERS_MODIFIED_REQUEST2=”GET /check_user.cgi?name=1234567890&loginuse=admin&loginpas=password&user=admin&pwd=password&”
CHECK_USERS_MODIFIED_REQUEST3=”GET /check_user.cgi?name=987654321&loginuse=admin&loginpas=password&user=admin&pwd=password&”
CHECK_USERS_REPLAY=CHECK_USERS_HEADER+CHECK_USERS_REQUEST
CHECK_USERS_MODIFIED_REPLAY1=CHECK_USERS_HEADER+CHECK_USERS_MODIFIED_REQUEST1
CHECK_USERS_MODIFIED_REPLAY2=CHECK_USERS_HEADER+CHECK_USERS_MODIFIED_REQUEST2
CHECK_USERS_MODIFIED_REPLAY3=CHECK_USERS_HEADER+CHECK_USERS_MODIFIED_REQUEST3
In the constant CHECK_USERS_MODIFIED_REQUEST1 I changed the name parameter to make it shorter, and in CHECK_USERS_MODIFIED_REQUEST2 I made the name a bit longer, and in CHECK_USERS_MODIFIED_REQUEST3 I reversed the name, but kept the amount of chars the same.
Sending 1 or 2 does nothing and the server doesn’t even reply back. Sending request 3 however, works just fine, and produces the correct output.
What we just learned from this is that the header has values specifically related to size not content.
If we try to replay the same packet twice in a session, we see another weird behavior.
The first replay works fine, but the second one doesn’t produce results, but does produce the failure acknowledgement. Maybe the acknowledgment packet signifies that the is formatted correctly, but won’t give the results if the values aren’t 100% correct. My guess would be that the bytes that control size are fine, but the bytes that control order are not.
Let’s move on to deciphering these two mysteries.
Figuring out the Header
The first big mystery we want to solve is the header, how it’s made, and what we can do with it. To do this,we will open up Android Studio with the Eye4 app and do a full capture, from logging into the device, to changing all the settings in the client.
Here are some examples, I pulled them all in order from when the were received. I also do a little number analysis on it and print out the result.
CHECK_USERS_REQUEST=”GET /check_user.cgi?name=123456789&loginuse=admin&loginpas=password&user=admin&pwd=password&”
When writing this test, I noticed that the 8 byte segments were very similar to the other 8 byte segments, so I wanted to break them up, because I was sure it was significant.
We want to take a look at the hex numbers and start comparing them to numbers in the header. We see, for example, that CHECK_USER_REQUEST length is 0x5c, which we can also see in the CHECK_USER_REQUEST_HEADER in byte[4]. We can see this in every request header.
Another interesting thing we can notice is that the CHECK_USERS_HEADER has a byte, very close to 0x5c, in fact, only 0x4 off. If we go through the other packets (except for the conglomerate one), we see this is the case every time.
Taking a look at the conglomerate packet confirms our suspicion that the 8 bytes right before the GET request is tied to the request itself. We can also see that the top 8 byte header contains 0x1b9 which is 0x4 off the total length 0x1bd. We can also see the request headers match up with the total bytes in each separate request. We also can see the top header’s byte length is a 2 byte big endian integer, so we will need to plan for that.
Each of those packets were taken sequentially, in order, from the capture. We can see the last most byte in each of the headers denotes what packet order it’s on. We will need to keep track of the number of requests we send.
Ultimately, this all means that we can forge requests, all we need is the GET request length, and the number of GET requests the client has sent.
Forging Requests To Camera
Forging our own packets now seems pretty plausible, let’s give it a try.
This code will not only test if we can forge the first packet, but also the subsequent ones. Checking the Wireshark with a special filter shows the success.
- frame contains GET || frame contains F1:D1:00 || frame contains F1:D0:00
Now we are at the point where everything is coming together and now we need to know WHAT we can do with the device.
Getting a list of CGI.
At this point, we have a working client (for the most part), now we need commands to run! We are going to explore a variety of ways we can get more info on the commands that are available to us.
Wireshark and Testing Methodology
We can use Wireshark as a sniffer to get the request strings we want. We just open the APP as usual, and try each and every single option, button, etc. Try to do anything that might generate a GET. Then filter the GET packets out in Wireshark.
Decompiling APK
We can use Android Studio’s “Debug and Profile APK” feature to disassemble the APK into Smali. I didn’t know anything about Smali before messing around with this project, so pardon me if I get things wrong, I never really learned the language, I just used intuition on most of this.
Using the “Find in Path” feature in Android Studio let’s us search the project for any mention of .cgi. While some results aren’t going to be exactly as we want, we will get to see a majority of the surface level functions we can use.

If we actually look at some of them we can see some code that provides us with more info.
new-instance v1, Ljava/lang/StringBuilder;
invoke-direct {v1}, Ljava/lang/StringBuilder;-><init>()V
const-string/jumbo v2, "set_sensorname.cgi?&sensorid="
invoke-virtual {v1, v2}, Ljava/lang/StringBuilder;->append(Ljava/lang/String;)Ljava/lang/StringBuilder;
move-result-object v1
invoke-virtual {v1, p2}, Ljava/lang/StringBuilder;->append(I)Ljava/lang/StringBuilder;
move-result-object v1
const-string v2, "&sensorid0="
invoke-virtual {v1, v2}, Ljava/lang/StringBuilder;->append(Ljava/lang/String;)Ljava/lang/StringBuilder;
move-result-object v1
invoke-virtual {v1, p3}, Ljava/lang/StringBuilder;->append(I)Ljava/lang/StringBuilder;
move-result-object v1
const-string v2, "&sensorid1="
I don’t need to really know smali to know what I’m seeing here. We have a java class, StringBuilder, building a CGI string to send out. By looking at these segments of code by the CGI strings we have found, we can also mine more information on what arguments some of these commands use.
Decompiling SO
I noticed after a while an interesting pattern I kept seeing after it made the CGI string, it would call a method:
vstc2/nativecaller/NativeCaller;->TransferMessage
However, no amount of googling lead me closer to finding out what it did, and worse, I couldn’t find the method ANYWHERE in the smali. I must have searched for hours.
Finally when I did find it, it was just a stub method, there was no code to it at all! Then after a bit more googling I learned that methods gained from Shared Object files won’t show up in a Smali decompile, since it’s only decompiling the Java, not the assembly. When looking through the shared objects, I found one called libvstc2_jni.so, which seemed to be what I was looking for. I tried decompiling it on Linux but I couldn’t find a good tool to do it with and ended up using onlinedisassembler which worked pretty well as I mainly just used it for it’s string search, rather than wanting to pour over ARM ASM.

Decompiling Firmware
I’d also like to decompile the firmware on the camera, but unfortunately, I couldn’t find a good method to pull a copy off the device. I was, however, able to get a hold of an update, (Finally I’ve been waiting for months for a firmware update I could listen into.), which doesn’t contain any CGI info, but does contain some other interesting stuff I’ll detail later.
Googling
Ripping through Shared Objects, Smali, and Wireshark captures is fun and all, but sometimes you just want real human English answers. I spent a lot of time googling things during this writeup, as well as when I first sat down with the device months ago.
Finally after getting so far, I wanted to see if there was ANY information out there about this API, so I set out with a couple choice google searches, and an understanding of what “down the rabbit hole” truly means.
I started with googling “vstarcam api”, which lead me to an interesting SDK page. Once there I quickly located a CGI manual, let’s open it up and take a look inside.

Oh no, the manual is in Chinese, but at least we are getting closer.
I tried “vstarcam sdk” and ended up finding an english manual. I also noticed this forum post, which also talked about the poor security of the VStarCam firmware.
In this post he talks about some juicy things, one of which I discovered in an update I went through.
There was also another post about the camera, although it mentions it by a different name, unsurprisingly, the picture even is the same one I have. This guy went deep into the nitty gitty on some of the exploits, some of which I’d like to try myself now that I know about them.
Also, after referencing the manual, I did not notice any commands I didn’t find already, or see any that weren’t listed.
Extras
I’d like to wrap up this part here, there will be more parts coming soon, I just have a LOT more material to cover. To end things, I’d like to share some interesting information I dug up.
After studying this thing for months, I FINALLY received a firmware update. I wasted no time sniffing the connection and learning some cool stuff.
When it started the download, it used the auto_download_file.cgi script. With it we can supply a server, and a file to download. Potentially abusable! We will definitely cover this in a later part.
I immediately grabbed a copy of the file and went to town in binwalk, extracting all files so I could take a look. One of the first files I noticed, ipcam.sh, had an interesting thing inside it. This is the file verbatim.
When I saw this I thought, “Oh man, someone left telnetd on and had to turn it off in a later update.”
After downloading previous updates from caches online, I found that this was indeed true. It is also backed up by this article, specifically in the section “CVE-2017-8224 – Backdoor account”.
I thought that was super funny.
Another interesting find was some of the developer names were accidentally left in some binaries, by way of a home directory listing.


I also found another interesting tidbit, the password they use to zip is hardcoded into binaries added in some of the updates.

Wrapping up
We went through a lot today and I hope at least some you found some of this useful. If you own one of these cameras, please disconnect it from your network. This thing is basically just a bot connecting to a botnet.
There will be a Part 2 coming soon.
My plans are to talk about
- Abusing some of the CGI commands
- Poking and prodding at the settings.
- Writing a fake camera server to try to coax password out of the client
- Finalizing the UDP protocol
- Getting our hands on a full firmware dump
Any and all code from the project can be found on GitHub.
APKTOOL ARMV7 AUDIT CAMERA CAPTURE CLIENT DECOMPILE
by: RedCodeFinal
Blog link: http://blog.0x42424242.in/